- Start your adult income steadily and with a good foundation?
- Free guide (outdated)
- Clips4sale guide step by step
- Step 1 – Create a Clips4sale account
- Step 2 – Enter Your studio
- Step 3 – Categories – choose your destiny
- Step 4 – Choose a good name
- Step 5 – Clip Store appearance
- Step 6 – Produce Your first clips!
- Step 7 – Add the clips to your store
- Step 8 – Get your store activated
Start your adult income steadily and with a good foundation?
You want to get started right away the right way? Perfect. I totally recommend a slow approach. With my clips4sale guide you earn money first, then invest some of it to improve. Don’t start by losing money.
Except if you got $1.99 left, then I recommend buying my eBook now.
The thing is, my article was so well received that people started copying (stealing) it. So after 2 years, when some of the info below started to get out-dated, I made the decision to write an up-to-date eBook for all the newcomers, instead of updating the guide.
Here it is:
My eBook

 Sorry to interrupt here, I just wanted to tell you that my story, my vision and my Clips4Sale starter guide are now available as an eBook for just $1.99. The Guide is based on my free Clips4Sale Guide for Adult Newcomers, which you are reading right now.
The Guide is almost 2 years old now and you wouldn’t believe how much things have changed. I re-edited all of it, re-wrote and updated it and wrote a lot of new passages into the book. It’s priced at the lowest possible ($1.99) and it’s formatted to be read on any device.
You can do well with all the free articles here, but to be honest, those $1.99 get you an up-to-date and complete eBook about starting your business on clips4sale, so I would just buy that and be happy.
Click the book to buy it on amazon.
Free guide (outdated)
Learn from my mistakes and know right from the start what I had to find out in hours of (sometimes frustrating) trial and error 🙂 Be like a mountain with your business. Rock solid, steadily growing, increasing your base while rising out above the clouds. Resistant to misfortune and if a piece breaks off, it doesn’t shake your core.

Imagine your business were a mountain
I know that I repeat myself, but I am actually not the only one who, in all honestly, can only recommend to start on clips4sale. This site is called adult-income alright, and I really plan on covering other topics than clips4sale. But my first and foremost concern is to get people in need a safe income. When I see what kind of work some people on earth (have to) do, I get really sad. I would get angry, but I am not the type. I am more silent and shy. So, if you don’t like Clips4sale or outright hate it, big portions of this article won’t help you and as I don’t have any other site covered at the moment, I am really sorry for that. You might want to read some general guides (like equipment), come back later or read on and get a new view on Clips4sale. You can also sign up for the email updates at the top of the page and I’ll inform you whenever there is news. Anyone else, we go to Clips4sale to make an account. Our business might still be a small rock, but we can place it on the biggest mountain in the clip site industry right away. It won’t fall off until it’s big enough to become a mountain itself – if you ever wish to do that. We will get to that much, much later. Since Clips4sale can look scary (it did to me when I started), I will try to guide you along the way. My guides aim at humble, honest and good people who are ready to put in some work. Other sites could pay me all they want. Until any of them show the potential (especially for newcomers) that clips4sale.com has, I will keep recommending clips4sale.com. Note: Clips4sale is great, but don’t expect to live off it right away or even get rich (soon). You will have to work long, hard and smart (my guides will help with that) to accomplish anything more than an extra income. Clips4sale (c4s) does not have any program that pays me money to send you there or recommend them. I am just grateful that they exist and give us all a great opportunity to be our own boss and have an (extra) income that would otherwise not be possible.
Clips4sale guide step by step
Step 1 – Create a Clips4sale account
Obviously, you need an account now. Go to http://clips4sale.com/list/en/page/openastudio Here are the requirements:
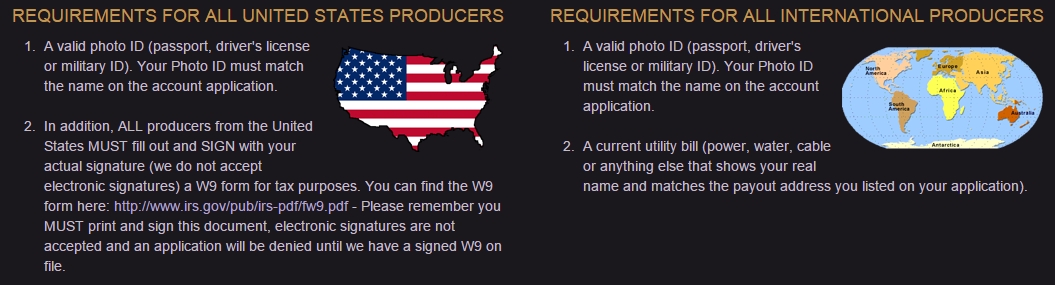
clips4sale requirements to start adult income
Read their rules as well:
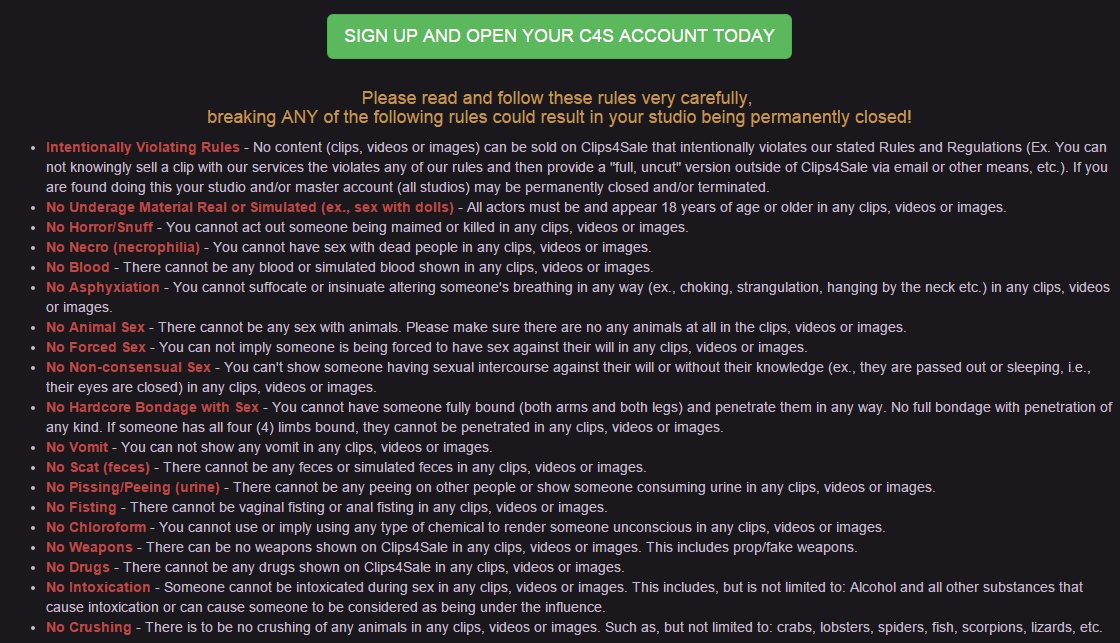
clips4sale rules
Let’s go through this list quickly. It looks scary, but it’s mostly common sense. Don’t get into arguments with the support about it, the rules are not always as exact as you think. I recommend strictly abiding by the rules as stated, until you have been active on c4s for a longer time, even when you see someone else not following the rules. Use your energy to grow your own business first. When you later have a clip that you really like but you are not sure if it’s following the rules (e.g. “is a baseball bat a weapon?”) ask the clips4sale support team. Until then, don’t use a baseball bat in your clip 😛 Read the rest of the signup page, it’s useful information. Hit the green signup button. You are on your own from here, I don’t know the procedure after that. But it should lead to an easy and fast signup if you have the required documents ready. Make sure all your personal information is correct and complete. We are building a serious business here and clips4sale will keep your information in a safe place. Notice that the signup page, like your studio later on, is secured by Hyper Text Transfer Protocol Secure (HTTPS).
The signup at clips4sale is safe
If you want to know more, here is an article about HTTP vs. HTTPS.
Step 2 – Enter Your studio
Log into your studio. You will be staring at this page a lot. All navigation after login starts from the “HOME” tab. It’s indeed your business’ home, so we will take some time to have a good look around. It’s also called the Store Administration Area, admin area or backend (back-end). The country flags at the top don’t do anything. You can click them if you’re bored, but if you’re bored, you could also be working. So just ignore the flags :). The tab Advertise doesn’t work either. You can go there and click empty links that won’t do you any good. Ignore it as well. I just saw that there is a “Change Font” dropdown menu at the top right. Lol, I never noticed that! So what can I say, apparently you don’t need it. However, if you wish, you can adjust the looks of your admin area there. It also allows you to increase text size, but I recommend to hold down the ctrl key on your keyboard and move your mouse wheel upwards. At least, that is how it works for me. When you are happy with the appearance of your back-end, we’ll continue with the HOME tab. Notice that I use the default appearance as I never touched that “Change Font” menu.
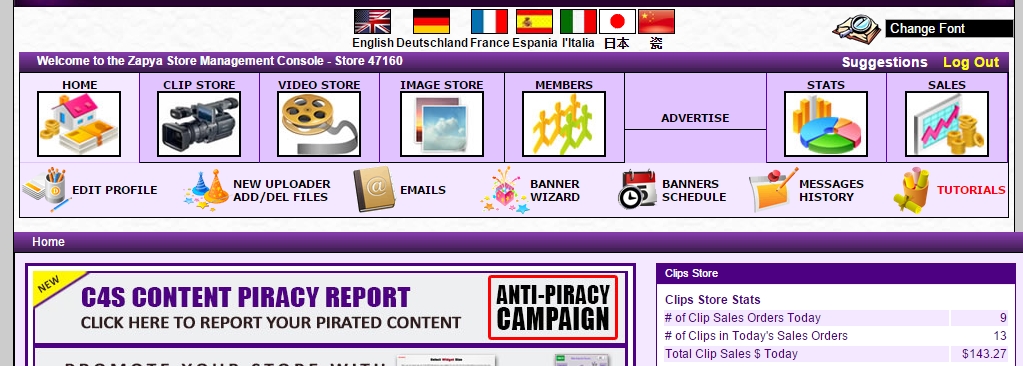
Clips4sale admin area “Home” tab. When I took that screenshot yesterday, I had made $143.27 that day already. It was a very good day!
Since you are currently in the HOME tab, let’s have a look at the sub tabs. I’d say just click around and find out for yourself. If you need me, I’ll be waiting here. If there is anything you don’t know or wonder about, refer to this list:
 | Your personal information and payout settings. You can choose ACH, WIRE, CHECK and probably Payoneer soon. I use wire. |
 | You add clips from here, see the Add Clip Guide. |
 | Send emails to your existing customers who subscribed to your mailing list |
 | Create a banner to promote your store |
 | See where your studio banner is being displayed |
 | Read clips4sale site announcements from the past |
 | Opens the tutorial page |
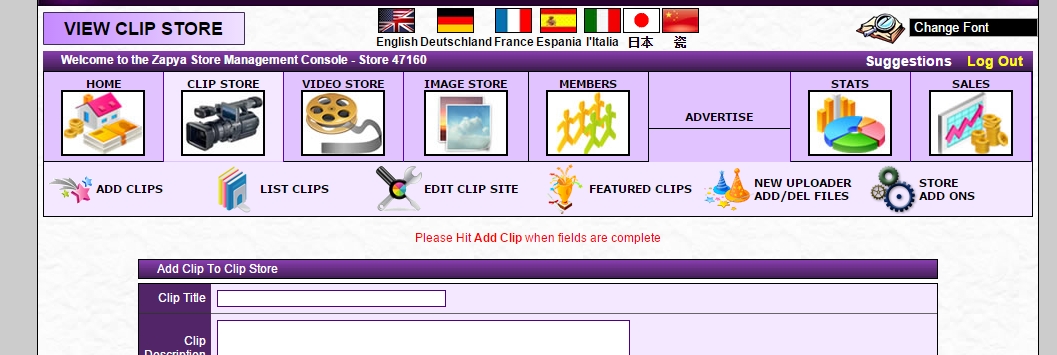
This is the clipstore tab in your clips4sale admin area. You will use it all the time.
You have the big “VIEW CLIP STORE” button at the top left, which I use most often to look at my store. Have a look around again. Get a feeling for your new online office. Then come back, we still have a lot of things to discover 🙂
 | This is where you give your clips a title, description, set the price, add a preview and such. We will have a closer look at that soon |
 | This will take you to your clip list. All the clips you ever added are listed there and you can edit the descriptions, delete, deactivate, change previews. We will have a closer look at that as well. |
 | Here you add your clipstore title. It will appear like that all across clips4sale. You can also enable/disable clip previews, add keywords, a google analytics code and most important, the html code for your store. If you want to change your store's appearance, you need to be here. You also activate the clip display order from here! |
 | Featured clips let's you choose clips that appear in a featured slider on your clipstore. You can schedule when and for how long they should appear |
| This is the built in FTP uploader that let's you upload all your files to the right location. Same link as in the HOME tab. |
 | This lets you add the facebook, twitter and google+ buttons, connect your twitter account to your clips4sale, add a feedback button to your store and enable your tribute button |
Step 3 – Categories – choose your destiny
Now you need to think about what you want to do. What would you love to do? I recommend what I did: Start in one category, build a solid (fan)base and then go to other categories by sending out ‘feeler’ clips that give you an impression. I’ll get back to those ‘feeler’ clips, when I cover how to post clips. If you rather want to discard my advise and start in different categories at the same time, by all means, do it. Be aware that it has immediate disadvantages. You can just continue reading, as the following advise will connect with either “business model”, single or multiple category based. I put that in “” because I normally don’t talk like that. I don’t have a business background. It was just for lack of a normal word that would fit as good. So whether you want to start in one category (recommended), focus on two or three (I would only recommend that if you have a lot of time to work and you want to work very hard) or start in lots of different categories (not recommended), you will still need ONE category that your store will get listed in.
If you have a fetish and are not afraid to use it, do it. It will help you a lot!
If you have no clue which category you should start with, I’ll give you a few guidelines.
- You need a category that you want to spend a lot of hours working in. Something you consider fun and exciting
- When you go through the clips4sale list and find a category, click on it. When the Top Studios and Top Clips list are not full (=50 ranks each), it’s a rarely used category. Be careful with these. It could mean not enough visitors are interested in your content and no one will go to your studio. If you have a really strong desire to use the category anyway, like you have the particular fetish or you have a connection to a big community in that category, you could be the one to revive the category and dominate it from the beginning. It really depends on yourself. My personal recommendation would be to search for another category for the time being.

- Don’t be too general. Don’t start in “amateur”
- Don’t try to compete in the most frequented categories. Categories like Foot Fetish or Tickling can be difficult to start in, because there are a lot of daily updates that push you out of the potential visitors view. There are also a lot of new studios opened there that will destroy your advantage of having a top advertising spot as a newcomer. I will talk about what that top spot is soon, don’t worry.
- Look at the “Studio Name:” list in the middle. The one that’s divided in columns. The dates in the “Updated:” column, tell you how frequently new content appears in this category. If there are more than 5-7 entries / day on average, it’s maybe too busy for you. If there are less than 1 / day, it’s maybe not busy enough. However, don’t let this factor alone guide your decision.
- Look at the #1 studio in the “Top Studios” list of the category you like. If this studio has much less clips than the obviously dominant studio(s) in that category (with lots of clips). That means one thing for you: In this category, it’s possible to beat the big guys even if you are small. Now this could be because the #1 studio just started on clips4sale, but was a famous pornstar or webcam model before. Be careful about that. It could also be that the model dominates another category with a big following, but has just decided to post into this new category as well. Curious fans then bought her clips anyway, although they might not be interested in that new category in general. E.g. the studio is well known in Wet Look and does now post clips in Underwater fetish.I quickly found an example for you of what I mean. Look at the picture, then read on below it.
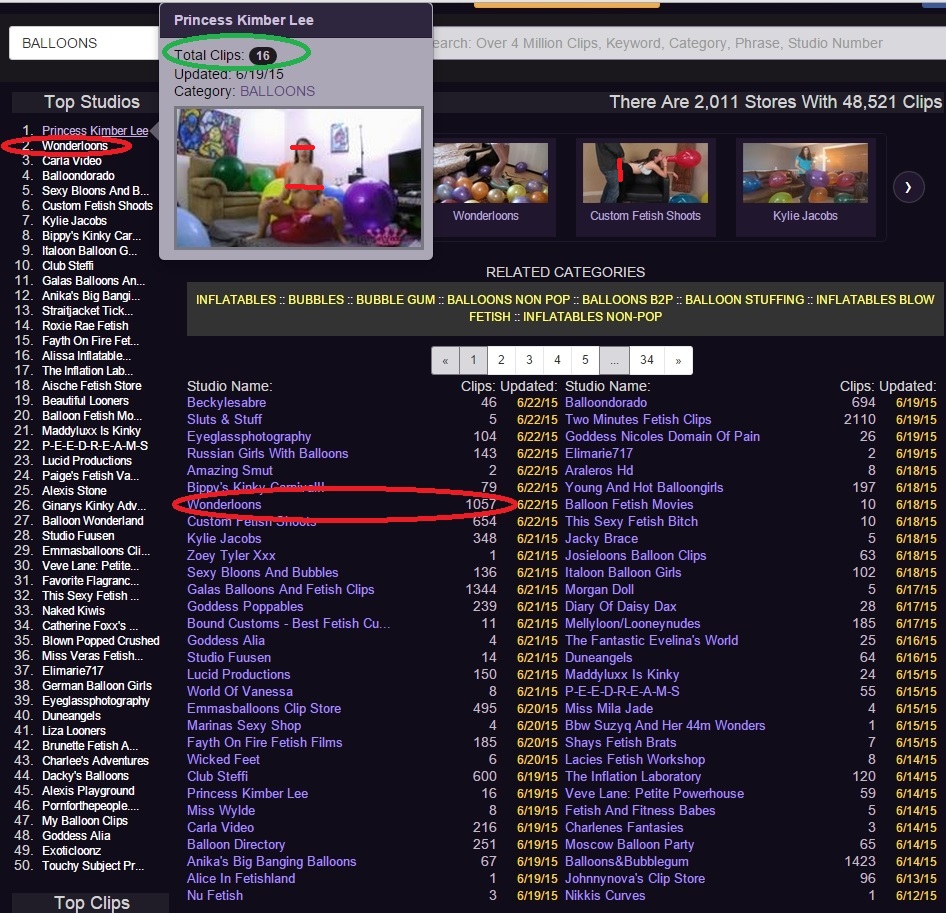 At the time of my screenshot, the category BALLOONS was lead by a small studio with Total Clips: 16. See the green eclipse. Be aware: this “total” is only the total for the category we are viewing (balloons). She might have many more clips in other categories. So this is not her total clip count across clips4sale, you can’t judge from this if she has a big following elsewhere or if she is a pornstar. So what do we do? Visit her studio. We see right away that she is a young amateur. To see her “whole” studio, change the url so that it does not only display her balloon category. Remove everything but her studio number: http://clips4sale.com/studio/82669 or even http://clips4sale.com/82669 would work. A little research shows that she has about 550 clips at the time of me writing this and posts in lots of different categories. Maybe with a blow job focus. I didn’t really investigate too long, it’s just an example. She has several studios and it could be that she has a big following from a cam background, but googling her alias kimber_lexxx or Kimber Lee doesn’t give us much to work with. Kimber Lee is obviously a female pro wrestler.I have seen models do well that have famous names, like Xev Bellringer, I am just not sure if that’s actually allowed from a trademark point of view in all cases.In this case, it could just be a coincidence.Anyways, I don’t deem her fame status the reason that she is on #1 here. She certainly has a following on clips4sale and she has increased her updates in Balloons over the past week when I wrote this, which I assume is because she noticed that it’s selling well. So, it’s not entirely possible to decide how she got the sales to get to #1 and beat the “big guys”. From looking at her content, I can tell you that it’s what balloon fetishists (looners) want to see for sure. Another thing you notice from the screenshot, is that she has not been updating since 3 days, but is still on #1. She also does not have the Top Clip in that category. Her newest clip is #2 though. That tells us that her success in this category is not based on one good clip alone. Several of her balloon clips sell very well. I suppose she is on #1 because a few fans bought all her clips, giving her some boost from big orders. It’s guesswork though.. What I do know, is that the longer your studio has not been updated, the less sales you make. Having not updated for 3 days in that category and still being #1 is unusual. We would have to have another look tomorrow to see what happens with the rankings. I expect the dominant studio “Wonderloons”, see the red eclipses, to take over again sooner or later. Actually, as you can see from the lists, several studios have a few hundred clips in that category and “Wonderloons” has just updated again today. Disclaimer: I don’t know Kimber Lee at all. Kimber Lee, if you ever read this, I hope you still do well and just let me know if you don’t want your name in here. A few days later, three big studios are on top again:
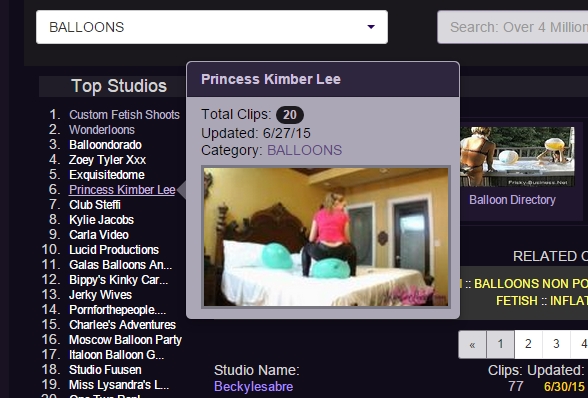
I think these are the 6 most important points. I know it’s been a long and exhausting read. Take a break if you want, get something to drink. I’ll eat something.
Okay. All set?
You might wonder why we talk about categories so extensively. It’s because it’s important, not only for now, but for later on as well. So this is really not just to get you to your first category, it helps you monitor your potential in general. So, what do you look for when you search for your (first) category? I recommend:
- Something fun and exciting that let’s you be creative. Ideal: your own fetish
- Something specific (not “amateur” or “fetish”)
- A category where both top lists have 50 entries.
- Something that has between 2-7 updates/day on average. Be aware that a week has 7 days and there are always much more updates in the weekend!
- You can enter overcrowded categories (8+ updates a day on average) if you either have that fetish yourself or a studio with few clips, higher in the ranking than a big, recently updated studio, indicates that even small fish can swim here. See the Kimberly example. Note that she did not start in that category and big balloons cost a fair amount of money. She will probably have a fan pay for them. At least I hope so 🙂
Don’t let the money guide you. It’s poison that you can only take so long before it kills you.
Metaphorically speaking. We will get into that whole motivation aspect much later, now we want to get our first clips up! Don’t fake a fetish. Customers will notice a fake from a mile away and while they still might buy your clips, you won’t do as well as when you are authentic and you won’t enjoy it. If you can’t be authentic, enjoying yourself is second most important. No clip says don’t buy me again like one with a model in it that would rather be anywhere else. If you happen to have a fetish in an overcrowded category like Foot Fetish, you can always try a sub-category like Dirty Feet, Dipping or Abused Shoes. Pick your category and come back here. If you want, observe a category for a day. See if the top lists change, when people update etc. No hurry. Starting a day later won’t change a thing. I’ll still be here when you are ready.
Step 4 – Choose a good name
You have a category, that’s 1/4 of the things you need to open your store. The other things you still need are a name and clips to get your studio activated as well as a design for your clip store page. Although you can log in to your admin, your studio is not live yet. No one can see it until you added the ten clips and had c4s staff review it. When they approve of everything, it gets added. Actually the moment they activate your studio, your studio name and main category will be published with your store. So in order for them to be able to activate your studio, you need to have entered your studios name and picked your category from the drop down menu. Click the ![]() tab and then click on . The title field is at the very top, the category is near the bottom of the page. Once you have entered everything, click submit in the bottom right corner. While the name is important, we won’t need to get into as much detail on that as the categories, because you can always change your name later. The category will stick to you forever. You probably have a name that you already like. Think about adding something that describes you or what you do – a keyword for your category – as well. That will make you turn up in the search results more easily. I know that I don’t have that myself. I made many mistakes that you can avoid today. I started with the name 2pee4you and then had a big following before I noticed I should have used some keywords. I changed the name to 2pee4you peeing and wetting, but it had an immediate negative impact. People would not recognize their favorite store anymore and the few people more that found me through the search did not compensate for that. I also had been on #1 in the Pee category for months already, so I guess pee fans knew where to find me, they did not need the search.
tab and then click on . The title field is at the very top, the category is near the bottom of the page. Once you have entered everything, click submit in the bottom right corner. While the name is important, we won’t need to get into as much detail on that as the categories, because you can always change your name later. The category will stick to you forever. You probably have a name that you already like. Think about adding something that describes you or what you do – a keyword for your category – as well. That will make you turn up in the search results more easily. I know that I don’t have that myself. I made many mistakes that you can avoid today. I started with the name 2pee4you and then had a big following before I noticed I should have used some keywords. I changed the name to 2pee4you peeing and wetting, but it had an immediate negative impact. People would not recognize their favorite store anymore and the few people more that found me through the search did not compensate for that. I also had been on #1 in the Pee category for months already, so I guess pee fans knew where to find me, they did not need the search.
I am not sure, but maybe even the bookmarks to my studio changed. Not sure about that at all, so don’t tell anyone that I said that 😛
What I do know is that once a brand is established, you should not change the name. If coca cola would change their name to coca bak bak, they would probably loose customers. So pick a name that you can keep forever. If you are really cheap, you choose “AABC A Studioname”. That will probably get you to the first position in the Studio page. Wonder who would do such a thing? Just look at the studio page: http://clips4sale.com/list/en/page/studios However, not only is that a cheap attempt at foul play, dishonest and you should not do it on principle – in my opinion. It can also cost you big time. To be honest, it probably will would!
 I tell you that because I don’t want you to be tempted to choose an “a ABC” name. Don’t be cheap. Be honest and work hard and you will go a long way, even if you can’t be found in the search or studio list. Good news for you is that, in addition to what I just told you, you can be found through search and the Studios page. Just don’t choose a name with a number in front (for now, they will surely fix this again soon). Keep all of that in mind and you are already at an advantage compared to when I started. Good! Note: Avoid names like N-A-M-E or N A M E. No one searches for your keyword with a space or hyphen after each letter! Now that we got that covered, you should really feel free to choose any name. As you see in the toplists, few stores have keywords in their name. I do recommend it though. Don’t make my mistakes, start the right way!
Step 5 – Clip Store appearance
Now that you have a name and category, you have half of the things you need (2/4). This step (3/4) is complicated and you won’t be able to learn all of it from me. I had so many clip store designs, you wouldn’t even want to know. Don’t, I repeat, don’t copy my design. I don’t forbid it, you are free to get inspired, but it’s really not working very well. So I recommend getting your inspiration somewhere else. I once had a “design” that was decent in terms of reducing my bounce rate, but when I established it again a year later, it was horrible. Bounce rate is the percentage of people that go to your site and close it right away, without clicking any link. In other words, they don’t like what they see and leave. We cover that later when we get to analytics. So yeah, you are pretty much on your own here. I just quickly tell you what you need to know. To edit your clip stores design Click the ![]() tab and then click on You will get to this page:
tab and then click on You will get to this page:
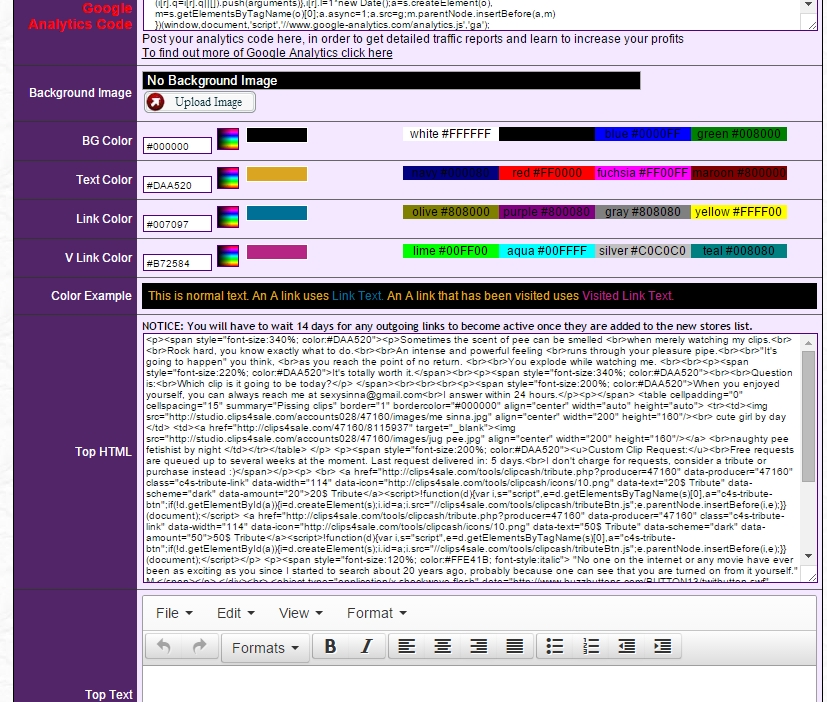
Here you can adjust your clip store’s appearance
You have obviously been here before to enter your studios name and main category. Some studios have no Top HTML at all. They are just empty. I don’t recommend that. It’s a missed chance.
However, it’s not as big of a disaster as you could assume.
Why? Because when someone enters your studio by clicking on it anywhere on Clips4sale.com, they won’t get to see your store design anyway. That’s right. Don’t ask me why Clips4sale did that. I suppose to increase overall sales as a lot of studios really have bad store designs and it’s better to take the customers right to where the clips are. Again, guesswork. What they did is set an anchor #startingpoint. If you want to know what an anchor is, read here. Anyway, every link to your store’s page on clips4sale, be it a link in the category or on the main page, has the #startingpoint anchor attached to it. Here is the link that you get when clicking on my studio in the pee category: http://clips4sale.com/studio/47160/Cat208-PEE/2pee4you#startingpoint And this is the link from the main page: http://clips4sale.com/studio/47160/2pee4you#startingpoint The anchor #startingpoint sits about here in your studio (the red line):
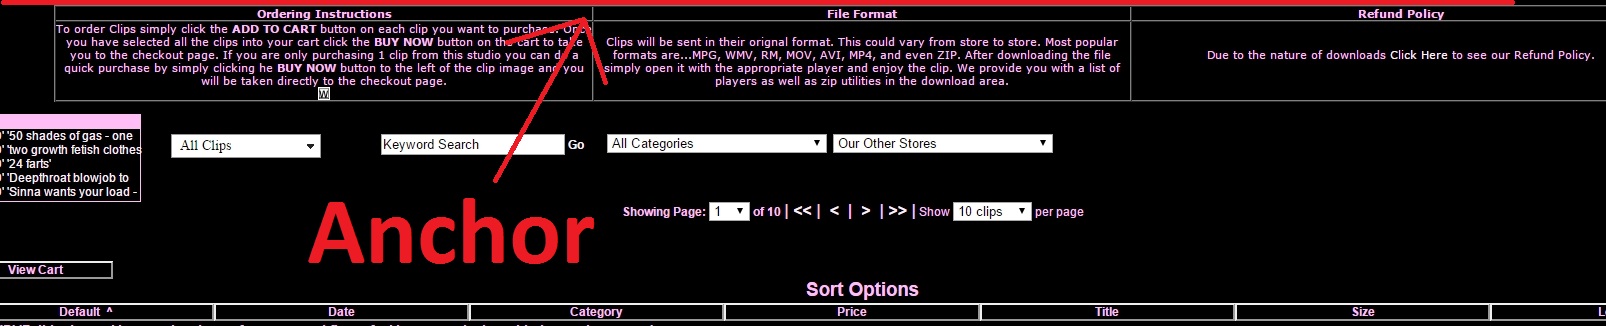
The Anchor #startingpoint makes the browser go directly here
Or here when you have the featured clips enabled: 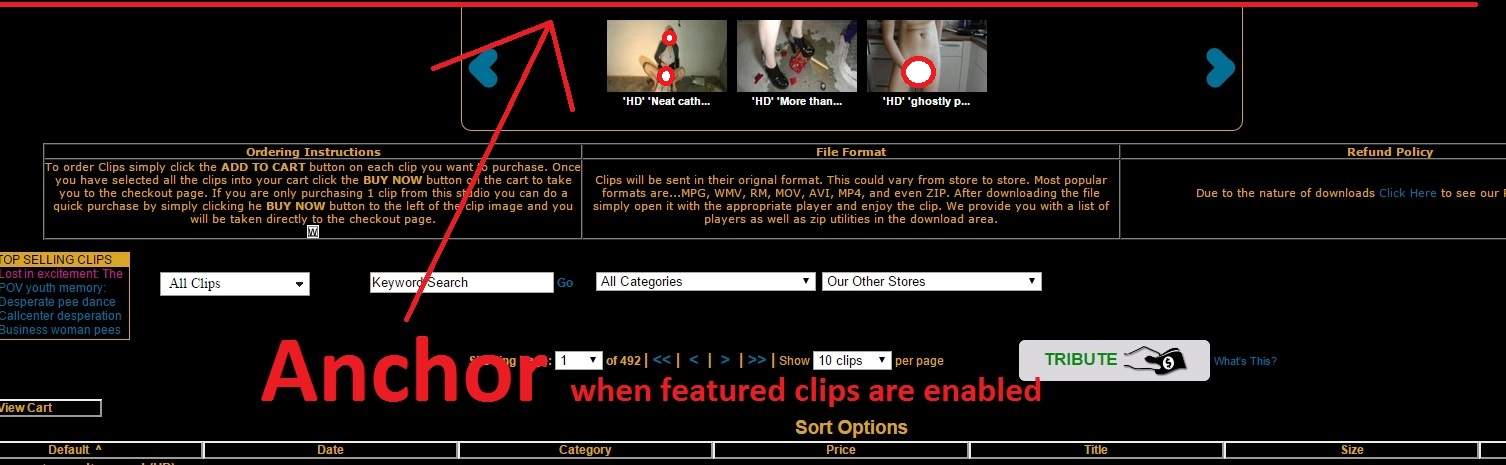 Your store design is being jumped over and the viewer is automatically scrolled to the positions that I show above. Some studios have been able to mess with that. I don’t know how. Maybe they entered the same anchor earlier in their html. I have tried to use anchors for different purposes, they never worked correctly. As I said, I am not a technical person. I just wanted to show you why it is not THAT important to have a Top HTML (=store design) up when you activate your clip store. Later on you want that to be as good as possible, because there are plenty of links leading to your store that do not have the anchor #startingpoint. Those will get to see the top of your studio without getting auto-scrolled down. Maybe just add a sexy picture, that always helps. Humans like pictures! When we visit a website, we immediately scan for pictures. So use that to your advantage:
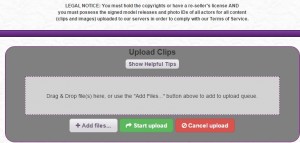
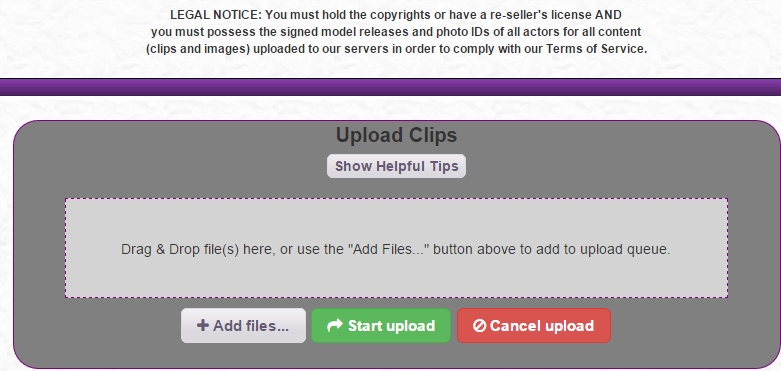
Upload a picture
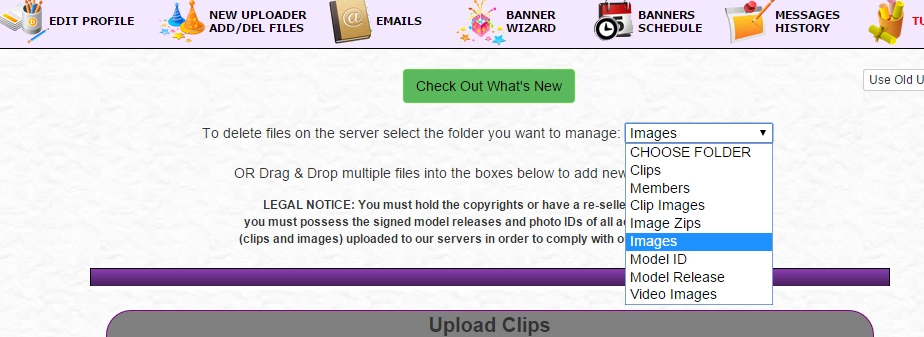
- Go to
- Then go to Upload Images and hit
 . Beware of a common mistake. Don’t upload to Clip Images but to Images which is further down. See the green rectangle:
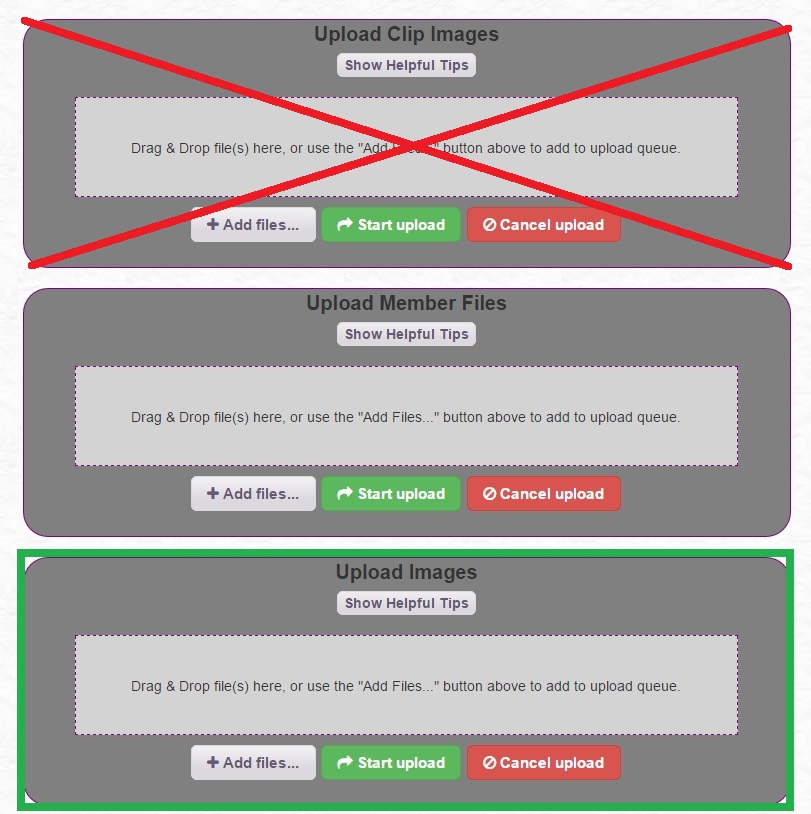
- Find the image you want to upload and click open. Now the upload does not start yet! It’s a common mistake to assume that. You actually have to click:

- Upload should start. When it’s done, the progress bar disappears and the file name is there.
Find your personal HTML code
You add a picture with HTML code like this: <img src=”http://studio.clips4sale.com/accountsXXX/47160/images/funny.jpg” align=”center” width=”200″ height=”160″/> You don’t have to use width and height. That way, it will add the picture at full size (not always recommended). <img src=”http://studio.clips4sale.com/accountsXXX/47160/images/funny.jpg”> You can also add a width OR height and enter “auto” for the other. That way, it will automatically scale correctly when you adjust the other value. Example: <img src=”http://studio.clips4sale.com/accountsXXX/47160/images/funny.jpg” align=”center” width=”600″ height=”auto”/> Obviously, you need to replace the “funny” with your own file name. If it’s a gif, you need to replace the .jpg with .gif, same goes for .png etc.
- Go to
- From the drop down menu, choose the images folder:
 A new page will load, showing the contents of your images folder and the link you need:
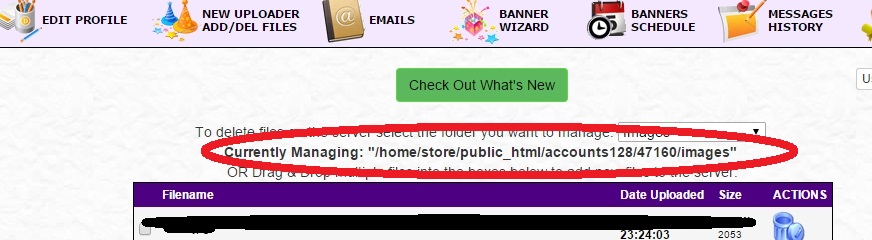
Add the picture
Now you just copy your link into your Top HTML in the area. Let’s have a look at it one last time:
Here you can adjust your clip store’s appearance
Don’t forget to hit “submit” in the bottom right. When I add pictures in full size, I don’t remove the width and height. I just put them both to “auto”. It makes me feel like it’s giving the picture the possibility to adapt to screen size changes. But let’s stop here before all the programmers laugh themselves to death, shall we? 🙂
Change the colors
You probably noticed the fields for BG color, text Color, Link Color and V Link Color. Change these to adjust the colors of your clip store. BG Color = background color V Link Color = color a link gets, after you have clicked on it I totally recommend changing colors, because you want to have a unique clip store and also start something that professionals would call “branding” – associate a certain set of colors, fonts, pictures, logos etc. with your brand. As we don’t have everything else, let’s do the colors. Now this is really important, yet it’s something that a lot of store owners don’t seem to know or care about. Bright red background with white text hurts your eyes and you are not able to read it. Same goes for bright green background with yellow text.
There are many color combinations that your store should not have.
They all exist on clips4sale! I don’t know why. You saw how easy it is to adjust that. Also, don’t use background images that have many colors and thus make your text difficult to read. Don’t use background images on repeat – that means they repeat themselves vertically or horizontally or both. As far as I know, if you enter a background image in the spot “Background Image” above the colors, it will always repeat in all directions. Don’t use it except you have a pattern that actually looks good when it repeats. Like tiles or something. Or nothing. My recommendation: Don’t use a background image. It needs resources to load, it can make your text unreadable and most of the time it looks ugly on repeat. If you want an image in your store, add it like we talked about earlier. Just put it up nicely – 1 time – in your Top HTML. Now the colors. I am not a designer and aside from noticing it’s a bad fit when it hurts your eyes / you can’t read it, I don’t know anything about color combinations. However, I know an awesome tool for it: http://paletton.com/ Play around and get color suggestions along with their complementary colors. Use the hex codes (e.g. #000000 = black) to enter your colors in your clips4sale store admin back-end. Play around a bit until you find something nice. If you don’t want to play, get inspired by pre-defined color palettes: http://www.color-hex.com/color-palettes/ Whatever you do, make sure the result looks pleasant and one could easily read text on your homepage for an extended amount of time. Ideally forever. If you want to get it perfect, try to have the colors create a feel that would fit your content. I chose something with yellow, to remind the customer of my (and probably his) pee fetish. But as I said, don’t take my studio as example for your design. I am not a designer and my store page is not doing very well for me.
Step 6 – Produce Your first clips!
Oh my god, we did it, we arrived at the clip making! Yeeeey 🙂 Step 4/4, we are nearly opening our studio and clip store! Don’t celebrate too much, we still have work to do. Actually, now the real work begins. We already have a solid foundation in terms of category, studio name and basic clip store appearance. Now we build on that foundation. So let’s see. You need ten (10) clips to get started on Clips4sale. I recommend 12 or more. All clips must be at least 2 minutes in length, meaning 1:45 minutes or longer. 5 of these clips have to be in your main category, the other 5 can be posted in other categories. I know that from Clips4sale support, don’t worry. It’s not on the site.
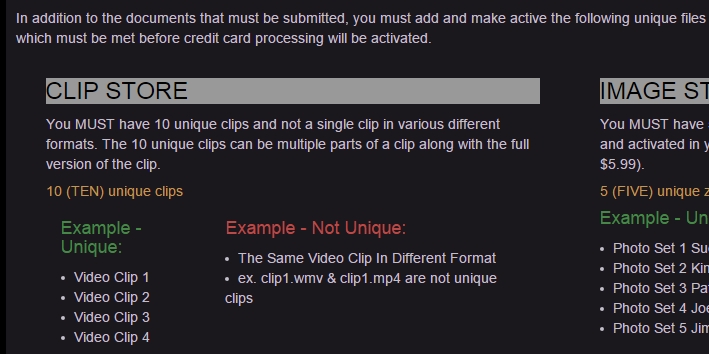
Clip requirements for the clip store
While they say that your 10 unique clips can be multiple parts of a clip along with the full version of the clip – meaning that you could just film 1 very long clip and then divide it into 9 parts and post it along with the full length version – I don’t recommend doing that. It’s like opening a bookstore and offering just 1 book and different chapters of the book on your big opening day. What about customers who don’t like the book? They won’t buy it and since there is nothing else there, they leave disappointed. They won’t come back either, because people don’t like to chase after disappointments. We chase after rewards. What about people who DO like it? They buy the whole thing and then there is no need to buy the chapters. So they leave and might not come back either. After all they got everything there was. I suggest giving people rewards instead of disappointments and at the same time getting the chance to sell more than 1 product. We will make 10 different clips. Think about it. If you can’t be bothered to make 10 clips and try to cut corners on your opening day, what does that mean for the future of your business? There will be no future. If you don’t have time right now, don’t worry. Clips4sale will be here tomorrow. Just make one clip at a time and when you have 10, come back here. Don’t give up now. We are close to making our first sale! Really close. While you are at it, I recommend making clips longer than 2 minutes. While 1:45 is the technical threshold for a valid 2 minute clip, who would be satisfied when they ordered a 500ml drink and then get served a 460ml drink. Would you? Or would you rather have a 550ml drink for the price of a 500ml one? Exactly. To give your customers all the choice you can on your first big day, I also recommend making clips of different lengths. It will also help you right away in judging what people want to purchase in your category. Let’s face it, your clips are fetish clips. People use them to get aroused and to get off. At least that’s true for most categories. People do differ in the amount of time they “need” to orgasm. It also depends on how hot your clips are, of course. Anyways, I recommend offering several lengths. Make a 2, a 3, a 5, a 7, a 10, even a 12 minute clip. Go for a 20 or 30 minute clip if you like. If you get stuck, describe what you are doing / seeing / feeling. Say it slowly, be detailed. Stop talking and just do something for a while. Talk with your looks, your body, your eyes. You can find more information about what to do in a thread that successful model Larkin Love started on stripperweb.com. In fact, if you remember the screenshot from further above, where I was on rank 15 on the main c4s page, Larkin Love is right next to me 🙂 You can find that forum thread here. It also contains other useful information. Note that mine and her advice don’t always overlap. Remember that she is well established and we are just beginning, so be a bit careful. What works for her might not work for you at the moment. Be aware that many questions on stripperweb.com revolve around money. You know my approach is not money based. Money should become a byproduct of our hard work and honest dedication. However, it’s just my advice. You are the boss of your business. While your first clips should be good, you are still learning and that is okay. Most customers easily forgive starting models if something is not spot on right away. In fact, that “amateurism” can be a turn on as well and your clips should not be spot on at all. They should just be you. Be careful with customers that send you messages and try to “form” you. Be yourself. Keep to your plan on doing what you enjoy.
Be aware that money is powerful, don’t let it blind you. It can hurt you personally and financially in the long run.
Okay I went off topic there for a little. Clipmaking. Yes. So do make different lengths, make at least 5 for your main category, make at least 12 in total (so you have two updates ready when your store goes live). That’s my suggestion. It’s always up to you. You are the boss. I only try to help. With regards to the content, I can’t really help you any further. I don’t even know what you are making ^^ One last thing: Read my Clip Length Guide for Clips4sale. It can help you a lot.
Hardware
To get started, don’t invest too much money. As I see it, income is what you have left after subtracting expenses. So we keep expenses at a minimum until we actually earned something.
Camera
You will need any form of hardware to make a clip. Seeing as it does not cost you extra, you can use your smartphone. However, I don’t recommend it.
You want to keep your adult work separate and secure from anything else.
So I would use a small camcorder or camera you have at home. I bought (and still use it today) the Panasonic-HC-V707. It’s not available in every country and there are newer, but also cheaper models. The newer models of it cost around $300-$400. It’s worth it. I had based my decision back then on extended online research, customer ratings and reviews, costs and quality (I wanted Full HD). Although it got wet a lot of times, it fell and I even dropped something really heavy on it (there is a big dent in the microphone) it still works without trouble and with good battery life. So I am a fan. Normally I like Samsung and Logitech. There are people who only buy Sony. It’s really just a suggestion. It’s ultimately up to you. However, I recommend to go with Panasonic. That was actually the first Panasonic product I ever bought.
Storage
Storage is very important later on. To get started, you just need a simple SD card and your computer.
Computer
Just use the one you have or get a pre-built model. Weigh the benefits of portable vs. stationary for yourself. I suggest you take one with a card reader! If you have a slow machine, you can get a faster computer from your first/second income.
Lighting
Lighting is important. Try to film in broad daylight. If you can’t, use a few lamps to light up the scene. Go to the room in the house with the best lights installed. Just use what you have at home for now. Be it a torchlight! Just make sure the scene is lit evenly. Don’t use lights so close that your viewer can’t see what your doing anymore. We upgrade on lights later on.
Film your clips!
Now that you have the hardware, get creative! Film your clips. Film in HD quality!! I really recommend that. It’s what sets you apart from the (often) bad quality of free (streaming) porn. If you use a tripod / have the camera in a fixed place, turn off the image stabilizer. It often looks like a hand in double brackets (see here). This will increase picture quality.
Software
We will use freeware, as we want to keep costs low. And honestly, there is a lot of software that costs money but is inferior to freeware. Don’t invest too much. We can always invest after earning some money.
Watermark
For clips4sale, we need basic video editing to get our clips watermarked. You want to watermark your things, because this is the internet. People want free stuff. I mean look at us, we are discussing freeware and we love it. So people will steal (buy) your content and publish it for free. I know it sounds bad, but it’s part of the business. We will learn to handle that soon. Actually, this is already part of handling it. Clips4sale also has started an anti piracy campaign. So you are not alone.

Banner of Clips4sale’s anti piracy campaign
You can use online services to watermark your videos. But don’t. See my Guide for … just kidding. Here is the complete guide on that: don’t use an online watermark service. Just use any freeware or what your operating system offers. I don’t know about Mac and Linux, but on Windows you can just use movie maker. If you know about Mac or Linux, don’t hesitate to comment and give useful hints below. What kind of watermark should you use? I recommend simple text for now. Don’t make it too big, you don’t want to annoy the viewer.
I did not use watermarks on my first clips and it cost me. Don’t take the issue lightly. You just have to configure this one time! So take the time and do it right.
Use your studio name or website or your clip store url or a combination. It depends on your long term plans. If you wish to publish your videos on other clip sites in the future, you should not add your c4s store url as a watermark, because some other clipstores don’t allow a clips4sale watermark. However, most of them tolerate it to get you to sign up with them at all. They usually offer higher payouts as well. They want to chew away at clips4sale bit by bit, because none of them can take clips4sale head on or be serious competition for that matter. Read my Clipsites article to learn a bit more about that. If you know for sure that you want to stay on clips4sale forever and try to become a featured store exclusively publishing on clips4sale, you can consider adding a watermark that shows the url to your c4s clip store. You need to have your store for 1 year before even being considered. So don’t think about it too much. The stores in the column “C4S Featured” are featured stores. They get additional advertising but need to be exclusively using Clips4sale. When I changed my watermark from showing my store url to showing only my homepage url, I felt like I lost a bit of traffic. So I have the feeling that having the store url in the videos increased traffic. That’s not scientifically proven though.

My first watermark
After that I had two watermarks  Later on I colored one and even added a huge, barely visible watermark all across the video. It was like 95% transparent. After some piracy issues, I really went a little crazy. With the colored watermark at the top right, I tried to get my “yellow” branding into the watermark. I was impressed by the beautiful, professional watermarks of other studios. I even had someone make one for me, but never used it. I somehow realized that it does not have to be fancy
Two watermarks, one colored
So I started using this, which I use since more than a year. Just a slightly transparent text with my personal homepage url. It really is just for the sake of having a watermark at all. It does not bring any traffic to my homepage.
My current watermark
Decide on your watermark and let’s go. It does not have to be perfect. Open the first file in your video editor and add the watermark. (I use Pinnacle Studio to edit my videos, but it’s crap! It always crashes. I am just not able to master the learning curve of the known Adobe products, like premiere pro or after effects) Export it to your hard drive as .mp4 if you can. If you can’t, .wmv will do. Export it with 5000-6000kb/s of Bitrate. Name it whatever you like for now. You can give it the proper name later. Next time, you can give it a proper name right when you export it. It will explain itself in a second. Please read on 🙂 Check if the sound and picture do indeed work. Check if your watermark is visible but not disturbing the viewing experience. If it does, change it and export again. Check if the bitrate is correct. In windows, right click the file -> properties -> details tab. Total bitrate should be higher than what you wanted. i.e. if you wanted 5000, it should be at least 5000. If you wanted 6000, it should be at least 6000. This is important.

The file properties -> details tab
If it doesn’t work, export in a higher bitrate so that the result will be in the range where you want it. Sometimes the bitrate after exporting is lower than what you entered. You tell a program to export in 10000 but you get 8000. So if you want 5000 and it does output 3000, do it again and tell the program to export in 8000. Check if the result is better. If that doesn’t help, don’t ask me. I have no clue about technical stuff!
Naming
Seriously Sinna, you have a chapter on naming? You bet. My biggest regret is my poor file naming. I am not kidding you, it’s a huge mess that costs me hours of time. With 19TB of files, I will never be able to fix this huge mistake: I should have used a system from the beginning.
You should learn from that and do it right from the start.
Choose a name for your clip. A good name that can also be the clip title later on. Choose wisely. Name the encoded, finished clip like that. Get the raw file (that you took off the camera) and name it the same way with the addition “raw” or something. Yes, I suggest keeping the raw files. They can be very useful later on. For the sake of perfect organization, add a number to it. I suggest starting with 1 🙂 Add HD to it (please tell me you filmed in HD! You did, right? Good.) You should now have: 1 HD My first clip raw.mts (Panasonic cameras make .mts files) 1 HD My first clip.mp4 or .wmv The store on clips4sale does not show your file name. So don’t worry about it. Make folders like “Clips” and “Raw files” and put the clips in there accordingly. Take a deep breath. You have just saved yourself hundreds of hours of time. You’ll just never know it and that’s a good thing. I wasn’t so lucky (smart) when I started, but at least I did not waste those hours for nothing now, which makes me feel a little better. Thanks for that! 🙂
Encoding
Many studios offer their clips in different file formats. Like .mp4, .wmv, .avi, .mkv, .mts, ogg and so on. There are many file formats. Clips4sale once announced that the most downloaded formats are .mp4 and .wmv. That means most customers buy these. In other words, they buy other formats less. Naturally, we will give them what they want. We want to have happy customers after all. Note: Clips4sale does only allow 4 formats in total, 2 SD (standard definition) and 2 HD (high definition). Less are always allowed, sometimes even recommended (e.g. when you aim to become a Clips4sale featured store) I suggest offering at least 1 SD and 1 HD version of your clips. From my experience at the time of writing this, many customers have a slow computer/ internet connection while many others demand high definition. HD: Use Full HD, which is 1080p (1920 X 1080) or HD ready, which is 720p (1280 X 720) SD: Use 640 X 360. Why? Most screens and mobile portable devices today use an aspect ratio of 16:9 (wide screen). You probably sit in front of one right now. Divide 16 by 9 = 1.77777. Now divide 1920:1080, 1280:720 and 640:360. It’s always 1.77777 Which means the resolutions above fit perfectly for a wide screen and that’s what most people use. I offer both .MP4 and .WMV in Full HD and SD in my main studio. So 4 formats in total. In my other studio, I only offer .MP4 in Full HD and SD. So 2 formats in total.
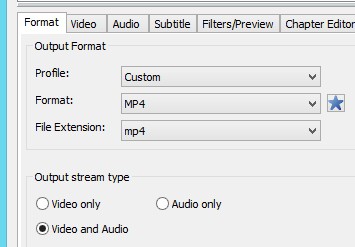
xmedia recode format tab
Go to the video tab:
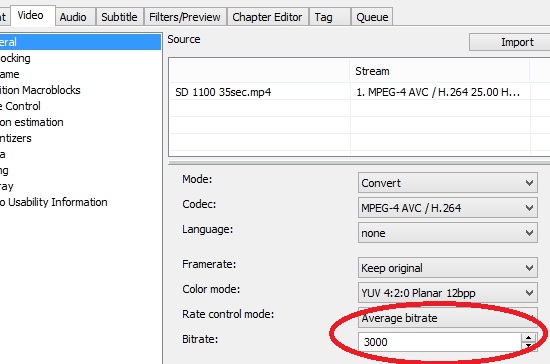
xmedia recode video tab
I only change Bitrate here. Remember, I am not a tech person. I don’t touch anything else than Bitrate. My SD clips are 3000 kb/s, my HD usually 8000. The higher the number, the better the quality. Don’t use any numbers higher than your original file though. However, I have massive amounts of storage space already. So for you I recommend these bitrates: SD: 1500-2000, HD 5000-6000. Which means you either enter 1500 or 2000 there now and then click on the Filters/Preview tab. There, you choose resolution, enter the width and height and “Keep aspect ratio”. This example uses the SD width and height:
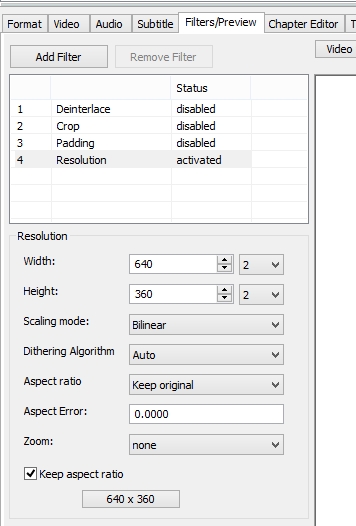
The Filters/preview tab lets you set the resolution
You are nearly done. Click on the button  at the top You can view the result in the Queue tab. There should be a 640×360 clip with a bitrate of 1500 or 2000 (whatever you chose) in the top row.

SD clip in the queue
Now do the same thing for .WMV HD and SD or, if your original file was a HD .WMV, add a SD .WMV and a HD and SD .mp4. If this sounds confusing, you just need to add the three missing files that you need to complete your list: 1 HD .mp4, 1 HD .wmv, 1 SD .mp4, 1 SD .wmv. Note that the “Queue” tab will show you how big the file size will be. Scroll to the far right to see it. Now I told you to go for these bitrates on purpose. They should be perfect so that:
- all your files should meet the requirements of clips4sale file sizes. See my Clip Length Guide for Clips4sale. I should save you a lot of time and frustration (again)
- all your files will have superior quality. Most producers on clips4sale have much lower bitrates at the time I am writing this (June 2015) and you sit within youtube/google guidelines for video quality
When you are done, click the button  Your encoding should start now. You see the progress in a pop-up window. If your computer is capable of that, set it to “High Performance” You can just minimize the window or leave it alone and do something else. If your computer has resources left. Otherwise leave it alone and pray 😉 When it’s done, rename the files (the F2 key helps in windows) so that you get: 1 HD My first clip.mp4 1 HD My first clip.wmv 1 SD My first clip.mp4 1 SD My first clip.wmv Repeat this for all of your clips until you have all 12 ready. So your 12th clip would be like 12 HD My twelfth clip.mp4 12 HD My twelfth clip.wmv 12 SD My twelfth clip.mp4 12 SD My twelfth clip.wmv You have 12 * 4 = 48 files. Upload only the 12 HD .mp4 files. I will tell you why later. Now depending on your internet connection, you can upload them all during the night (slow connection) or you can upload the first clip while you write it’s description and do everything else, then upload the second while you write that description etc. Or you do whatever you do, as long as you get them uploaded. Your great file naming will allow you to distinguish them easily. To upload the clips:
- Go to
- Choose
- Select the clips you want to upload -> open
Don’t forget step 5 or nothing will happen! Congratulations, you finished your first bunch of clips and successfully uploaded them to the Clips4sale servers! Now you can add them to your studio. Excitement! Only one last (important) thing:
Gif Animation
Clips4sale offers to add a clip image that will be shown next to your clip’s description. You can use a static image, like a screenshot from your clip. The position of the clip image will change soon. At the moment it looks like this 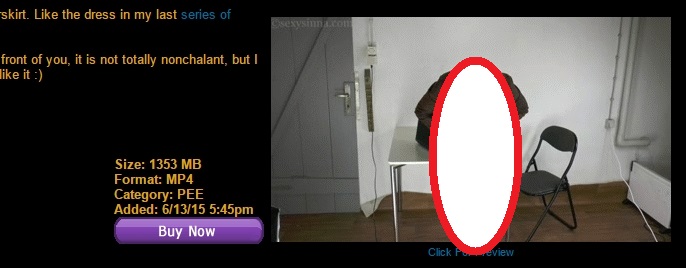 I recommend a gif animation. Why? Animations appeal more to people, because we like stuff that moves (imagine a scientific citation here). I use Free video to Gif converter, but I am not entirely happy with it. There are lots of downloads of it available that upset your anti-virus program. So I don’t offer a link here. Use at your own risk. Whatever you use, make sure the very first picture (frame) of the animation is a really nice shot, because that is what people are going to see when they hover over your store anywhere on the clips4sale page. They won’t see the whole animation there, just the first frame. It should be clear and enticing. I recommend making a gif before you add the clip. Why? I’ll get to that very soon, because believe it or not, now it’s time for:
Step 7 – Add the clips to your store
There we are. The mother of all your admin pages. “Add Clips”.
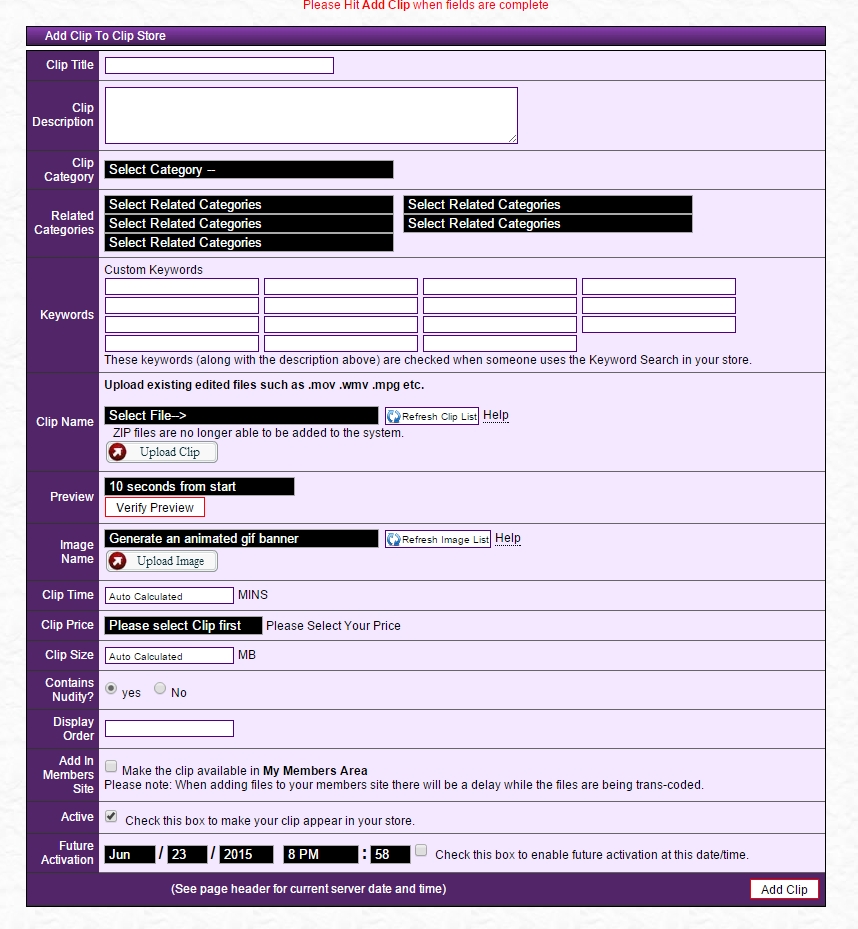
The Clips4sale Add Clips page
Title
As I advised you before, when you named your file, use something that could be the title. If you took that advice, you should add that title to the title field now.
Description
Below that is clip description. Now I have always been honest with these and I recommend you to do the same. If your clip description is misleading, just to make the sale or to let the clip seem better than it is, you could face a refund. Even worse, your customers could feel cheated (and rightfully so) and not come back. Don’t fuck with the customer (unless you are in the process of making a nice clip; just kidding). Most fetish niches have communities that are closely connected in forums and other websites. That means if you make a bad impression, your reputation could be long gone before you built one. On the upside, we are honest and hard working people. So we will get noticed by these communities and with a bit of luck, they will start to look at us and support us. We’ll get to that whole dynamic later on. I just wanted to say, write good, honest descriptions. Of course you can be juicy and sell your clip. In fact, after 4800 clips published, I just found this website and it opened my eyes so wide, you could park your car in there. Wait, I’ll look it up for you. Ah, there: 9 Simple ways to write product descriptions that sell (read it, it’s short) When I first read that, I wanted to buy the Multi-Color LED Flashlight. Then I shook myself and read it again. It was amazing information. In fact, I added a clip right away to test it. The results were mixed 🙁 However, I felt great and it seemed to work with some clips. A bit more testing and I realized, a combination of a description and a sales twist is what feels right to me and also sells clips. I just don’t want to loose my honesty, so I am careful with these “tricks”. But by all means, use them. In fact, after I read that, I went through all the top studios on clips4sale. Guess what? Yes. I found those tricks everywhere. I just did not see them before. I guess customers don’t notice either, they just get a stronger urge to purchase those clips. Like I wanted the flashlight. I did not blame the text, I really thought that I wanted to have it. That is what selling the product is. Don’t tell the customer to buy it, like “this is a must have”, create a feeling that he wants to buy it by himself. With that in mind, write your description. Don’t make it too short. Clips4sale will change things soon that let your descriptions be found in google, so it’s important to have a good amount of text and keywords.
Clip Category
Speaking of keywords. Choose your category. Remember, 5 clips have to be in the main category. The others can be in any category. You have a clip that would fit in 2 or even more categories at the same time? Well great. Now you know why we made those 4 files out of each clip 🙂 Add the HD .mp4 in the category you want it to sell the most, because this will be the file that most customers want. What I mean? Well. You are in the business now. You will try to conquer one or more categories. Like attacking the top list. As I told you briefly before, the Top Studios list is based on the amount of money you made in that category in the past 7 days, pretty exactly the past 7 * 24h = 168 hours. 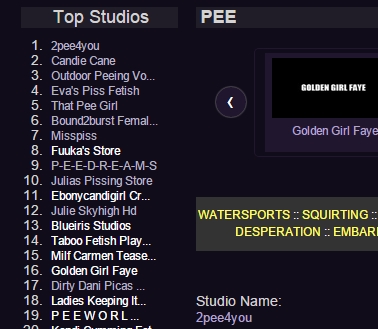 So, the more sales (=money) you make in that category in a certain amount of time, the higher you will climb in the Top list. That is the reason why you want to have your HD .mp4 in the category that you want to climb in. Of course it must fit into that category! Now you can post the other 3 versions in categories that are related (the yellow categories from the screenshot above are the #pee related categories), to spread out a little. You can also schedule them for the same category at a later moment in time, to get fresh attention. Either way, having these 4 clips leaves you with strategic options. We will cover strategies later. For now, just post the HD .mp4 of 10 clips. Keep the rest (38 clips) for later, when your studio is being activated. Reason is, when your studio is being activated, all the clips that you put in will be activated at once. Giving you 1 time exposure on the main clips4sale page. You do need 10 clips to start, but you can save up the other 38 and schedule them so that you will have front page exposure another 38 times from them, instead of just 1 time. Yes, everytime you update, you will get a brief moment of fame on the MAIN page of clips4sale. Like the best spot you can be in.
Related Categories
Select all related categories that fit your clips content. Your clip won’t be posted there and your name won’t appear in these categories either, but when someone searches for that category, they can find your clip.
Keywords
Also fill in all keywords.
Clip Name
Select the clip.
Preview
Choose whether or not you want to show a preview. I tried both, it doesn’t really matter. Previews will get you visitors that don’t buy and just watch previews. No previous might get you visitors that come to buy, but also those who are skeptical and won’t buy. I know that makes little sense. I have been typing for 30 hours. Excuse me. It really does not make much of a difference though. For now, I recommend activating the previews and setting each and every clip at an individual preview time. This will overwrite the preview clips option on the . Why choose an individual preview? Well look at the clip. What shows the best scene that could make a customer like the clip? 10 seconds from the start? 1/4 ? The 10 seconds starting in the middle of the clip? Try it! You can either use maths:
- Open your clip with a media player.
- Imagine it’s 5:38 in length.
- That’s 300 + 38 seconds = 338 seconds.
- Divide the total time (in seconds) by 4. 338/4 = 84.5.
- Divide that by 60 to get minutes. 84.5 / 60 = 1.41. 1 minute and 41 hundredths of a minute.
- Divide 41 by 100 then multiply by 60. That’s 24.6 seconds.
- So 1/4 of your 5:38 clip would be 1 minute, 24.6 second.
- Go to the 1:25 minute mark. Watch 10 seconds. Is it good? No?
Double the number. 84.5 * 2 = 169. 169 / 60 = 2.82. 2 minutes and 82 hundredth of a minute That’s 2:49 in minutes. Go to that spot on the clip’s timeline. Watch 10 seconds. Good? No? Calculate the 3/4 spot. See if it’s good.
OR
Use your media players timeline to estimate 1/4, 1/2 and 3/4 spatially. Like 1/2 is right in the middle. Watch 10 seconds from there. Easy, right? Once you decided what the best spot is, enter that from the drop down menu.
OR
Just leave it where it’s at. After you added the clip, you can still add a preview from the menu.
Image Name
Remember the gif chapter? Upload the gif that you made for this clip. If you couldn’t make one, take a good screenshot and upload it here. Just use the upload image button right there. ![]() There is an option to make a gif in the menu as well, but you are only allowed to use the first 5 minutes of your clip and on top of that, your clip image will only change later. That means the image that accompanies your clip during it’s main exposure time in the Recently Updated lists on the main c4s page and the category page, could be crap or – and that happens – there could be no picture at all during the first minutes. That means, during the most precious exposure time. It’s a rookie mistake that you should avoid. Have your clip image ready before you add the clip! If you don’t have a gif, add something. Take a nice screenshot if you have to.
There is an option to make a gif in the menu as well, but you are only allowed to use the first 5 minutes of your clip and on top of that, your clip image will only change later. That means the image that accompanies your clip during it’s main exposure time in the Recently Updated lists on the main c4s page and the category page, could be crap or – and that happens – there could be no picture at all during the first minutes. That means, during the most precious exposure time. It’s a rookie mistake that you should avoid. Have your clip image ready before you add the clip! If you don’t have a gif, add something. Take a nice screenshot if you have to.
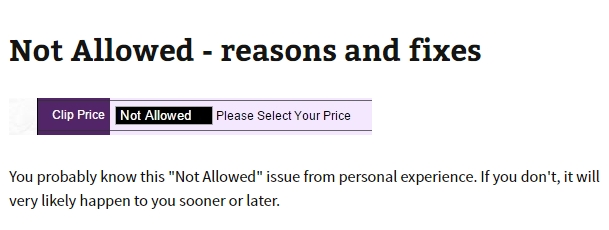
Clip Price
Standard price is clip length minutes + $0.99. You are free to choose. In my opinion, you should choose what you feel it’s worth. If that’s more than the standard, so be it. If it’s less, so be it. Just be consistent. However, don’t be TOO expensive. I suggest to ask no more than $4 higher than the standard price. Don’t charge too much for really short clips (< 5 minutes). They are quick snacks after all. Note that you can’t add all the prices you want. I will write an article about that soon.
Contains Nudity?
Fill this in. Don’t forget it. I have a feeling that this helps with promotion, i.e. non nude clips can be used on social media like Facebook, while others can’t. As I said, it’s just a personal feeling but I think filling this in is important. Whenever I forget it, I go back and change it.
Display Order
We need that! Open a new tab by right clicking -> open in new tab / window. All the way at the bottom, choose clip display order: display order# and ascending. Save it. Go back to the tab where you add your clip. Since we have multiple file versions, we absolutely want to put only 1 file (the HD .mp4) in the front of our store, while we push all others to the back. Like one is on the bright shelf in the spotlight, the inferior rest is in the dark and ugly storage room You can put in any number between 0 – 4999. Since you have 4 versions of each file and always put 1 to the front and 3 to the back, enter 2499 for your first HD .mp4. Then 2498 for the second and so on. Always decrease by 1 for every new HD .mp4. Later, when you add all the SD and HD .wmv files, give them numbers starting from 2500 upwards. 2501, 2502 etc. That way, the HD .mp4 will populate the front page of your store while the other versions vanish in the back. It’s certainly not perfect, but it’s better than anything else, including strange moves like opening another store for the other versions. Don’t do that!
Add in members site?
NO. Leave that open for now. You need more clips if you want to have a save foundation to start your live streams. If someone rips all your clips (steals them with illegal means) you could be done for. I will write an article about that as well.
Active
Yes. Today we activate!
Future Activation
We don’t need that for now. It will come into play very soon though. Like the red text at the top of the “Add Clip” page says, hit Add Clip! The button is in the bottom right. You get this message:
Clip Added Successfully.
You are now being redirected back to the index. Click here if you do not want to wait or if your browser does not redirect you automatically.
You get redirected back to the add clip page filled with some of the information you just added. That can be confusing, because you actually should not change anything there anymore. The reason is simple: Whatever you do, it won’t edit the clip or change anything.
Step 8 – Get your store activated
Clips4sale support is your friend
Yes, we are at the dawn of a new business. Write an email to support@clips4sale.com and ask them to activate your studio. Or be really excited and go to the live chat support for studios and ask live for your activation 🙂 Be sure to read my next chapters, because we really want to use that unique momentum that the activation gives us. Speak to you soon, I hope I could help you a little 🙂 XXX Sinna
written by Sinna 18-24jun-2015 ©www.adult-income.com


Sinna,
Thank you SOOO much for making this! I found your post on StripperWeb. This guide is absolutely perfect and couldn’t have come at a better time! I’m in the beginning steps of creating my clip store; my application was approved the other day! YAY!
The part about choosing a category for my store is overwhelming me. Say, I choose “Food”…about what percentage of my videos that I produce should be in food related categories? 50%? 75%?
Also, choosing “Food” won’t prevent me from making videos for “Panty Fetish,” correct? I just want to make sure that my Store Category won’t limit me from exploring other fetishes and that I don’t need to incorporate it in every single video.
Thanks again for all the time and effort you put into this site! I learned so much!
Hello Shyla
from your first 10 clips, 50% would be in “Food”. When updating your store after that (which you are about to, as your store got activated like that) it depends on the updates in food and whatever other categories you are good in. If you want to be prominent in food, depending on how often you update, I would suggest to post there every day or as often as you need to stay in the top 24 of recently updated studios, as the slider at the top of the category contains the latest 24 updates. That would keep you in an advanced promotional position.
Choosing food does not prevent you from posting in ANY other category, as long as your clips contain about 1/3 of the fetish that you are posting in. This is not only a c4s guideline, but a measure to make sure you don’t disappoint customers that buy your clips from any given category.
You don’t need to incorporate “food” in every single video at all. Go for a video that could be posted in 4 completely different categories, using your 4 versions of the clip. I totally recommend that. Just be aware that food, as your main category, is the niche you would want to be very present in. That way you increase your chances of selling all the videos you post there. Don’t let it slide when publishing anywhere else.
Do experiment!
P.S.: I am already working on the guide that will continue where we left off in the current guide. I am typing as fast as I can 🙂
XXX Sinna
Hi Sinna,
Thanks for this amazing exhaustive article. I was looking for information on how to start publishing on clips4sale when I came across the link to this article on strippersweb.
It is exactly the kind of information I have been looking for and it is such a big help as i didn’t have the slightest clue where to start because of all the contradicting information online. At least now I know.
I have bookmarked the article for future reference.
Have you thought about sticking all this in an ebook on amazon or kindle? if not you sure should!
Thanks for all your advices ! Now its time to make some clips !
Very nicely put together and while the detail is C4S specific, much of your advice could apply to many other business models.
I notice however that your primary fetish – pee, is directly against the TOS. How has that worked for you?
Hello and thanks for your comments 🙂
My fetish has restrictions, but peeing itself is not against the rules. I have a draft about the rules ready, because I know that they are easily misunderstood (better said understood in a way that is not intended by c4s). If you ready carefully, you see that peeing on other people or consumption of pee is not allowed. Everything else is allowed. I never pee on other people or consume pee. Whenever a studio posts a clip that is against the rules, the c4s support will contact them and ask to remove the clip. Consequences are subject to a case by case review.
So, my niche is just even smaller than pee, but I am not making lips against the TOS. Those who do gamble with their freedoms on c4s. If you repeatedly violate the rules, you risk losing your store forever.
aahhhh – so in some cases then, it comes down to interpretation!
yes, exactly. In some cases, you have to read really carefully and in other cases, you can’t know. Only c4s does.
Am looking for the article you refer to here: “…my article on the live members feature of clips4sale.”
It’s not written yet as I am still running a final test, but it looks like the conclusion is this: don’t do it. Your clips will be all around the internet. These days many use programs to rip stream videos and download them. Since they are free (or for whatever reason) they upload them to other sites and you will never get them taken down as fast as they spread. This is, of course, if anyone signs up at all. People easily buy a $20 clip. But if that same clip and 200 others are available for $20 for 1 month in the stream, they don’t want it. I guess it has something to do with the fear of recurring subscription.
Hi Sinna, I am loving your guides! I have a quick question I wondered if you could help me with –
So I am setting up my studio and I chose ‘blondes’ as my main category, purely because I don’t have a specific niche (I want to try lots of different things) and wanted something generic, and I am blonde so that is always going to be a factor in my clips. My question is, when submitting the initial 10 clips, if I have to have 5 that are just ‘blonde’, should I keep them fairly generic i.e a striptease or booty bouncing etc., or can I put more specific things in like smoking, and release that clip in smoking also at a later date – or do ‘blonde’ clips purely have to focus on my hair? In other words, is it enough that I am a blonde doing things, or does ‘blonde’ have to be the whole focus?
Okay maybe not such a simple question, but I hope it makes sense!
Hello Sofia,
as long as you are blonde and in the clip, your clip always qualifies for blonde. You don’t have to do anything with your hair (there are categories for hair as well, like hair, hair styles, hair cutting, hair brushing etc.).
I would absolutely recommend doing something that fits in several categories, like smoking. You can always post your clips in blonde and then another version in e.g. smoking. However, note that c4s wants to change the system of having several file versions into just having 1 version that the c4s system will then automatically offer to the customer in requested versions on demand.
Like you said, blonde is pretty generic so I am not sure if there is a lot to be earned in the category blonde. You need the 5 clips to activate your studio though. So you need to post 5 of the ten in blonde. After that I would recommend trying lots of things and adding clips to different categories that are more specific. When the 1 version time has come, I would recommend posting clips in other categories as well and just posting in blonde every now and then.
However, if you notice that you can establish yourself in blonde and make money there, go for it 🙂
Hi Sinna, thanks for replying so quickly!
I had no idea they were planning to change the multiple version rules. I think then I will post 5 in blonde and once my store is up and running post another version of those 5 clips in a more relevant category for better sales. I’d better get going quick before they change the rules by the sound of it!
All my videos will probably be tagged keyword blonde anyway, regardless of where I put them.
Thanks so much!
Don’t worry, I don’t think the changes will happen that quickly. C4S is a huge site and everything usually takes a while to implement.
Your idea sounds nice. I recommend searching for a few select other categories that you are good at and updating there quite often. I would not (just a recommendation) post in a new category every time. I would try to establish my name in a few, climb the ladders and go from there. That has worked best for me.
Thank you so much for writing this! I’m editing my clips site now and I notice there is no “category” option as you mentioned. All it says is ‘Tittle’ ‘Description’ & ‘Key Words’. Did they change things since you wrote this or is one of those considered the category?
Hello 🙂 Nice to have you here. The category field is all the way down the page, the third option from below.
Hi there! I’m in the midst of opening a new store. I was wondering what the difference was between “Tittle” & “Description” in the Edit Clips Site page. Most of my videos will be Stockings, Pantyhose & some fishnets…
I’m not sure what to put as my tittle and description.
Hey there,
the title is the name of your store. It’s what everyone will see and (hopefully) click later on. It’s very important.
The description is not as important. Just enter some keywords like fishnets, pantyhose, stockings .. that describe what your store is about. As far as I know, no one can see your description anywhere.
Hi Sinna,
Just opened a store as well but when I started uploading clips I saw this message:
The maximum allowed is TWO (2) FORMATS per Unique Clip.
WARNING: Do not spam updates by adding miscellaneous clip formats.
Studios that abuse clip updates to be re-listed in the “Recently Updated”
lists will have their clips deleted from the servers without notice.
So is this something I have to take very serious or just upload 4 versions of each clip as you have mentioned in your guide?
Thank you for the helpful article!!
That is correct, but they allow 2 different quality versions of each format. A format in my case would be .mp4 or .wmv. Within these formats, a high and low quality version of the clip is allowed. So, while there are only 2 formats allowed, you can post up to 4 clips.
However, due to recent changes on c4s, my guide is not up to date at that section anymore. They now partly disabled the store sorting functionality, which means all your clips are being displayed in your store, sorted by date, if you visit your clipstore through a category link (which many visitors do). Because of that, the clipstores with 4 versions look ugly. All the 4 version would be displayed after one another, showing 4 of the same clips to the customer at a time. Customers don’t appreciate this and are more likely to leave your store right away.
So, right now, I would suggest posting only 2 versions of a clip.
C4s said that they were working on a fix for this, so I did not edit my guide yet. If this remains the way it is though, I’d have to recommend using only 2 file versions. I am using the HD .mp4 and SD .wmv, to offer both, two different file versions (the most popular being .mp4 and .wmv) and two qualities to cater to fast and slow computers and internet connections (the SD .wmv is much smaller in size than the HD .mp4).
I hope this helps 🙂 Great to have you on the site, please use the star rating at the end of each article to show your opinion about each article. That helps me improve as well 🙂
Thank u for your fast reply! I was confused because they stated 2 formats per Unique Clip. Do the SD clips get downloaded a lot in general?
For me, HD is much more popular, although I charge 1$ more for HD. I would not want to miss SD sales though. I guess it’s about 80/20
Hello Sinna! Thank you for the great article!
However, I’m not new c4s user, but I found something new for me in your text.
I have a question: in, my studio (Tickling in Russia) we tried to made some Foot Fetish staff and Bastinado. In the bastinado we got some success, but in Foot Fetish – not. Maybe there’s a reason to open a new studio just for FF ? Because we have lots of FF ideas and we have actual clips in that category, but I think that users can be confused with our Name which contains the word “tickling” (maybe they won’t to see tickling at all).
Best regards!
Hello,
the problem with your FF not selling might be the popularity of FF itself. There are so many stores posting updates in foot fetish, that you will hardly get exposure. Try breaking into some related categories by going more specific. If you have certain ideas, I am sure you have specific, new, fresh ideas that are not like most foot fetish clips. Try posting them in related categories to get more exposure.
If you have a lot of ideas and clips, you could also bomb the category for a while to raise awareness to your store. No one forbids you to post a new clip every hour, but you need to have the clips and you need to take the risk and flush 20 updates into the category in one day which would otherwise have kept your store up to date for 20 days. This strategy is quite risky though and there are too many unknown factors for me to suggest you do that in foot fetish. If you know the category very well and you know your clips would be able to stand out, you could try to bomb for a day or two. In that case, I’d suggest a max of 8 updates / day, so you don’t overinvest and waste your clips too fast.
I would only open another studio if you have enough time and resources to update it daily / very frequently. If you can’t update a second store, stay with one store or you might end up with 2 losing stores.
Hi Sinna,
I took the leap and signed up for a clip4sale store! I want to start making clips but I’m not sure how to go about shooting the actual thing? how do you get an idea for a clip? do you write a story ? Do you write a script and memorize it or just ad lib? Do I have to talk if I’m doing something like i dunno, yoga pants camel toe fetish? I’m sure its easier when customers get customs and give you ideas of exactly what they want to see/hear but i don’t have any requests yet. Any advice? thanks
Hello!
Great to have you here and awesome that you started your store 🙂 A time of hard work and fun lies ahead and after all the trouble, hopefully rewards for your invested time (and money). Ideas for clips come and go, I think the more you click around on c4s and “live” the clipstore-owner-life, the more ideas you’ll get every day.
I always write everything down in keywords. Whats the clip about? Why? What makes your upcoming clip hot? What makes the customer get hard? What’s the essence? You should feel the excitement. Don’t memorize words or text. It’s robotic and cold (except you are a great actress). You want to convey a feeling, a sensation, a fantasy. You are not a text-delivery entity.
This is a problem with requests, because they are often very detailed and want exact words / sentences said at exact times in the video. That can make it very difficult to get into the feeling of the clip and the clips seem static and cold. Not to mention the hundreds of times I did things over because I forgot text. And even the hottest idea can leave you cold after you started filming it 20 times over.
Why did you choose yoga pants? Do you like the fabric? Making clips is easy when you enjoy it and know why others enjoy watching. When you can understand / feel the “fetish”. When you have a focus point or enjoy a part of the video-idea (e.g. pulling up yoga pants). Know the “triggers”. Google it, find fetish forums. What’s the demand? e.g. with yoga pants, one preference could be the stretching around the ass cheeks – or the camel toe you mentioned. What do camel toe lovers want to see? But: use your own ideas. No one needs yet another cameltoe clip that looks like all the others (except you are a celebrity or special in some other way). Hang upside down, dance, pull the pants way up, use a vibrator on the outside, stretch the cameltoe, sit on something with the cameltoe, make your cameltoe swallow a small human figurine – do something exciting!
I sometimes write a story. Most of my ideas come from myself – things I think about, fantasize, things I find hot and naughty. It’s an advantage if you have the fetish or at least know the keystones of what makes that fetish exciting. What makes yoga pants fans be into yoga pants? The feeling? The fabric? The color?
It sounds like you don’t want to talk in the clips if it’s not necessary. You don’t have to. Moan and sigh, convey what you seek to convey – dominance? Arousal? Innocence? Enhance your horny side. If the camel toe makes you hot / is the essence of your fetish, enhance THAT experience. Like, if it appears / you make it appear by pulling up the pants, focus on it. Say that you see it, touch it, describe the feeling. Or just moan when you touch it, moan when you pull your pants in and the cameltoe appears.
If the focus are the yoga pants, make them the exciting part. Stroke them before you put them on. Say that the fabric feels great, rub them gently on your cheek, then down your body, over your breasts… etc. Make it an EXPERIENCE not ‘a video’.
What would the customer crave? What would they pay to see you do with these pants? What could your clip contain that would make them hit the buy button instantly?
I get ideas on the internet, the top studios are a good inspiration (don’t copy! be unique!), top sellers / trends on fetish tubes and porn tubes and a LOT of trial and error. Rule of thumb: If you are all excited about a clip because you think you found the “holy grail”, the top clip to be, the best thing you ever did – it probably fails to sell at all ^^ You have to bring self-reflection, humor, irony and disappointment-resistance.
But there are so many cool advantages. Be your own boss, get vacation whenever you want, get paid more if you work more, enjoy your work… 😉
I wish you all the best! I’ll try to make a few tutorials about actual clipmaking soon.